Monday, December 3, 2012

Learning Alone in the Internet Jungle

Be The First To Comment
I recall several years ago when I used to post pretty regularly on Rosstraining.com's forum, I got challenged by a guy named Andy Patterson (aka:  The Fucker) to a conditioning challenge called Demolition Day.  That particular year's challenge was called the Magic 200.  It was pretty simple:  Take Ross Enemait's Magic 50 workout and multiply it by four.  Not one to back down from a challenge from a guy who sports the goofiest chrome dome that I've ever seen on all internets, I took him up on it. 

There was just one problem:  I had never done a one-armed snatch.  I didn't know how. 

A quick internet search led me to another, fellow blogger acquaintance, Sally Moss.  She had a great description of how to do this movement.  It's still there, along with a bunch of other good tutorials. 

I'll be the first to admit it:  learning movements off the internet sucks.  It's not easy to find people who know what they're doing and can show it to you it ways that you can understand.  Just try looking up how to bent press.  That's a fucking nightmare right there...and certainly don't go to the abominable Bodybuilding.com (WARNING:  dont' click that link!) to find out.  That move is the epitome of the problem we face when we isolated garage gorillas try to get back to the gold old days of strength training. 

It can be done though.  I paid close attention, practiced and completed the challenge.  Even when I had the opportunity to go to an EXTREME HARDCORE gym where my one-arm snatch was critiqued by someone who knows more than I do about it than I do, I was surprised that there was so little to clean up in the first place. 

Once again, I'm not claiming to be an expert and anyone who dares call me that will be subject to flogging upon my meeting them but I do have my guidelines that I'm about to impart on you on what has helped me learn some of the more loopy and obscure strength stuff out there when I have marginal-to-non-existent contact with the larger gym universe. 
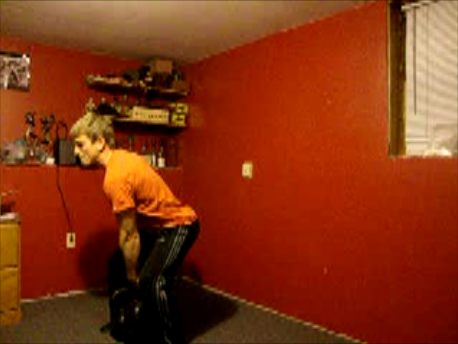
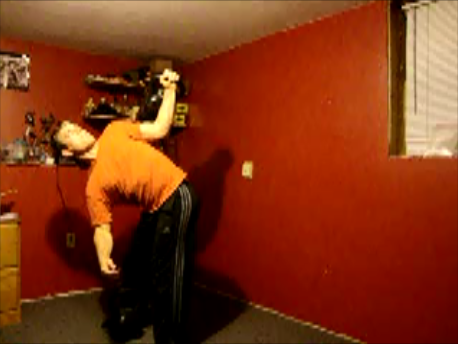
This is the video I most credit for helping me learn how to bent press, BTW


1.  Find Good Material To Learn From
The best teachers are those who can break down movements to the fewest, important directions to get the exercise done right.  Without anyone to be there to critique what you're doing, the fewer things you have to keep in mind the better you'll learn.  Good learning material also has good, if odd, cues to get the move right.  My friend Chip gave one of the most bizarre set of cues for doing a deadlift right not too long ago:  Crush your armpit trolls and squeeze your sphincter.  Strange, but it works.  I'm not kidding...look it up!  I've also noticed that well-known, good teachers who record seminars are often training gold.  I would imagine if you're going to teach a group of people effectively and quickly, you need to be able to refine your directions down to the most basic elements. 

2.  For God's Sake, TAKE IT EASY!
I hope this one is far more obvious than the first tip.  Don't go for the biggest chunk of weight or the hardest variation on the move right from the get-go.  Take things easy.  Very easy.  Take long breaks between attempts.  Shelve the workout musice for now.  Put the movement you're trying to learn at the beginning of your work out, treat it like practice, and don't try to get some of that muscle soreness that we all crave from our work outs.  I started bent pressing with a 35 lbs kettlebell back in Summer, 2010.  I can now bent press a 111 lbs kettlebell.  Patience pays off.  It's not a coincidence that impatience alliterates with injury.  We need to accept the fact that learning alone usually takes longer.  It's the drawback to being a loner. 

3.  Pay Close Attention to Where You're failing
One thing that I try to do when move a bit past the point of practice and more towards working out is I try to pay attention to what my form is when I start and where it is when I finish.  Something's going to be worse than when I started.  Whatever that something is will tell me where I'm weak.  Figuring this out also gives me feedback as to what I need to improve with execution or what I need to strengthen.  

Certainly don't ever miss an opportunity to get "professional" help.  After all, every major book and video that you can dig up on the topic at hand will warn you ahead of time that that what you're about do something that could kill you to death if you're being an idiot so you should find someone way smarter (with lots of acronyms after their name) than you to show you how to do it.   It's still a good idea though.  So, never turn that up.  Otherwise, you're left to your own intelligence, patience and observation powers to learn how to move in strong ways.  It's entirely doable though. 

So, if you have no choice, go and do it.

Sunday, December 2, 2012

For The Love of Bent Press III: Two-Hands Anyhow my Bodyweight

Be The First To Comment


A little over a year ago, I started expanding my Ironmaster set by picking up a second handle. The first thing I tried with two kettlebells was doing a two hands anyhow with a 65 lbs and a 55 lbs KB. It was the start of a "lift" that I fell in love with ever since and beginning on that modest incursion into two hands anyhow lifting, the goal that floated around in the back of my mind was to be able to do my bodyweight (175 lbs, or 180, depending on how much ice cream I eat) in this lift.

It's been a slow climb but I can now confidently do 176 lbs (111 lbs on one KB, 65 lbs on the other). Calling this pile of movements a lift is a misnomer since it's actually three or four lifts into one. They all have the same basic core move: bent pressing one weight heavier than the other. What kinds of weights lifted, how the first weight gets to the starting position, how the second weight is lifted, and if how the weights get put down can change. My Two Hands Anyhow looked like this:

1. Clean the 111 lbs 'bell.
2. Bent Press it, grab the second 'bell.
3. Curl it up to a racked position.
4. Press it overhead.
5. Bringing the 65 lb'er down to the ground via partial windmill.
6. Carefully lower the big guy with two hands to the ground.

While I have a natural attraction to the odd when it comes to working out, I learned a lot from this whole excursion into Two Hands Anyhow excellence.

First and foremost, the bent press got rid of any lingering doubt of dropping the first weight. Looking at the bottom of a pack of iron that weighs as much as a petite woman will either force most to get over it or get your skull stoved in. I did. It'll also make you bilk every ounce of strength you have on that side of your body.  I enjoy these kind of do-or-die challenges in my training.   
My right-hand bent press isn't as pretty in video

Second thing that I absolutely had to get better at if I was going to bent press any kettlebell over 85 lbs was cleaning and racking the KB properly. I got into the habit of having a wide stance when I was using a sandbag to bent press. That wide stance played hell with heavier KB's. I just couldn't pop that bitch up enough to get it into a good rack position with my feet so wide. My poor wrist and elbows paid the price. Good, focused practice made permanent and I got that under control.
Not the most fun part of the lift
The biggest carry-over benefit I got from this 15 month journey came from pressing the second weight overhead. When you've already got a skull-crushing quantity of metal in an overhead position, you can only press another 65 lbs one way: THE RIGHT WAY! No leaning forward, backward or to the sides. Otherwise, you risk dropping the first weight. Not fun.
I feel like Arthur Saxon already!
Most people I've seen bent press don't bother to put down the weights. They simply drop them. I opted to partially windmill the second, lighter weight. Windmilling when the bottom hand has a weight actually makes the exercise easier. So, it was good practice to getting the quantity of iron I can windmill up. When I traveling by car, I usually brought only one kettlebell. So, a common practice on those trips was to substitute a bent press/windmill for my Two Hands Anyhow work. I don't think this would have been possible had I not thrown in the windmill move into my Two Hands Anyhow.
So, there's been some practicality to doing this for so long but really, this is just a fun way to lift weights. As long as I've had the equipment, I've done this lift twice a week since pretty regularly since that first stab at the two hands anyhow back in late-January, 2011. It's easily my favorite lift and now that I've maxed out the capacity of my Ironmaster Kettlebells on the bent press, I'm looking forward to trying out bent pressing on a barbell.   
 

Friday, November 30, 2012

Homemade Secret Weapon

Be The First To Comment
For those who don't know, I'm a bit of a Grip Strength Fan!
I love training grip and enter competitions to test my strength
One of the common events in grip comps is closing grippers


Not the kind you find with plastic handles that come with skipping ropes, but the big torsion/spring loaded type (the pic here is of a Vulcan Gripper from David Horne's World of Grip and is in my opinion the Daddy of All Grippers!)

To train for grippers the best device is the gripper itself, however there is device that is also great for training hand strength and hence gripper strength and that is The Secret Weapon

To go ahead and buy a Secret Weapon would cost quite a bit of cash, however I've been coming up with a few homemade versions of this Grip Machine (which I haven't put into practice yet), but have found somebody has already made one (and very good it is too)

The principle is very simple, the device mimics the closing of the hand like when you close a gripper but allows you to microload the weights.
 
Materials Required a fairly straight forward:
Wood
Pipes
Bolts and weights

Check out the original forum post here

Very soon I will share with you an idea that is very similar to this that has escalated my hand strength and costs just pennies

Sunday, November 4, 2012

Letters to Myself

Be The First To Comment
A while ago, Jim Wendler (as always) wrote a very good article for T-Nation:  A Letter To My Younger Self.   It got me thinking about what I'd love to tell myself, relative to training, when I was a teenager.  If you look down the livespill comments, someone asked him what he'd tell his future, old bastard self.  That was kind of interesting too.  So, I figured I'd follow suit, writing two letters to my former and future self...

Dear Young Justin,

First of all, you need to stop being such a procrastinator with your homework, especially the English and literature essays.  Write them on time and stop doing the all-nighter papers.  There's no reason that you need to fail this class three years in a row, GODDAMMIT!  Don't wait 15 years for it to sink in that you write pretty damn good and you might have blown some opportunities just because you were being a lazy, little shit who didn't want to do work in a class you should have fucking aced! 

How do I know this?  Well, because I'm you, 17 years later.  I'm going to tell you a few things that you should be doing to make life a bit easier, more enjoyable, and certainly more fulfilling. 

I know you're looking in a mirror, all 5'8" and 130 lbs of you wondering when you're going to get dad's massive bulk and freakish strength.  I've got some bad news for you:  it's not going to come as naturally to you as it did him.  If you want to look like you should be taken seriously and be strong enough to pound the shit out of someone when they don't, you need to take things into your own hands. 

First, start eating.  A LOT!  Eat a pile of steak, eggs, and nuts to compliment all of that milk you're drinking.  You know that protein powder you're eating instead?  Stop bothering with that.  It's all shit that would have been thrown away had someone not thought to put a steroid junkie on the cover of a container filled with it in the first place. 

In a short time, Mom and Dad are going to get a membership to that fitness club so you can go.  You're going to start doing the machines and running a lot.  Don't bother with either.  They won't help you as much as you want to be helped.  You're going to see a bunch of kids from school you don't like doing stuff with barbells and dumbbells that you're going to want to dismiss because you're such an independent-minded loner.  This time, that's a mistake.  Figure out how to do what they're doing. 

That would be a better start to working out but don't do just this.  You already goof off and do some push-ups and pull-ups.  Keep doing them.  As strong as you get and as many exercises as you try, you'll never regret any of the work you do with these two movements. 

Next, don't stop doing sports just because you got a job.  Keep doing lacrosse.  You have time to work later.  You won't have time for lacrosse when you're an adult.  Also, there's an obscure little school in Burlington teaching this martial art called Brazilian Jui Jitsu.  Start taking classes in that IMMEDIATELY!  Trust me, this will be a life-changing moment for you when you go. 

Also, stop being so awkward with girls.  You might be a skinny fuck but you're still not bad looking and there's actually a few girls that like you that you think you don't have a chance with.  Don't bother With Chandra.  She's nothing but a tease that's using you.  Besides, someday you're going to be even better looking than you could possibly imagine (if you eat big and train hard) and she's going to look like a bloated beach ball. 

I do have to give you some credit:  you don't drink, smoke or do drugs.  Bravo!  Keep it up.  you're going to thank yourself for that later.  You'll also thank yourself for not blowing your money too. 

Above all, don't forget this:  There will a girl you meet online.  Above all, DON'T FALL IN LOVE WITH HER!    Yes, she's got big boobs and she's great in bed but just remember the 4 F's of dating:  find her, feel her, fuck her, and forget her. 
This is where she ends up after you're done with her...


Now, to my future self...

Dear Older Justin,

Hi!  Remember me?  I'm you at nearly 32 years old.  You know what made us so awesome?  Right around the time most of our peers were turning 30 the had expended most of their youth on pointless shit, and were bitching and moaning because they were getting old.  Well, they were getting old and they weren't doing a fucking thing about it except doing all the same, stupid shit that they did when they were young and they just accepted that they were going continue getting fat, grey, wrinkly, weak and broken down.

Well, you didn't.  Actually, you cleaned things up even more and got serious about getting more awesome as you got older.  You'd train even after the hardest work days.  You'd insist on finding healthy food no matter how much of a pain in the ass you made of yourself.   You were also curious enough and demanded to know the truth about what the right way to live clean and strong. 

What I'm most concerned with is if you kept all of this up?  Is your fire still lit?  I hope you've remained as stubborn as ever about eating healthy food.  I hope you still have the energy to train hard and effectively as often as possible.  I hope you learned from my mistakes about not getting enough good rest a few years back. 

Most of all, I hope you passed that on to Henry (and any other children you have now).  For all I know, 20 years old is considered middle age now.  Lord knows, that whole notion of 30 being old was ridiculous enough.   I hope you're not pretending you're healthy by taking god-only-knows what kind of hideous drugs they've come up with at this point.  Don't give up like everyone else did, and don't let your kids see you giving up either. 

He didn't.  Don't you either!
Best of luck to both of you,

Justin_P, 31.75 years old. 

Friday, November 2, 2012

Below the Bar? What a Shitty Title!

Be The First To Comment
If you're reading this page, I'm guessing that your thoughts about the modern industrial fitness complex are somewhat similar to mine:  they vary between nausea and pyromania.   They have a pile of bizarre ideas that don't do much in the way of getting strong or healthy.  The only thing that they do well is drain your wallet.  Just in case you forgot how stupid they can be and you needed a reminder, The New York Times just recently provided one for you:  Why Women Can't Do Pull-ups.

Somehow managed.  Great Blog, BTW!
 
We have to state the obvious:  women generally aren't as strong as men.  Men have more muscle, shorter connective tissue, and better levers for doing most things strength-related.  So, the article got that part right.  I do recall something from my couple of months of reading (and re-reading) books on anatomy (pre-baby days, when I had time to read and re-read stuff):  levers are designed to be either powerful or precise.  So, if a body doesn't have the inherent, raw power to pull itself up to the bar, then it's capable of more precise, coordinated manner to generate the force needed. 
 
In other words, if women, weak men, or tall-big men with poor leverage want to do pull-ups, they need to PRACTICE!   It's completely unknown to me what modified pull-ups, back and biceps exercises that they did in this story to produce the positively lackluster results but I'd venture to guess it wasn't nearly enough pull-up practice and progressions.  I'm certainly at a loss as to what a bunch of muscle-wasting cardio is going to help with. 
 
Genetic Freak?  Or just persistently smart  about the way she does things?  Either way, a nice and fun person!
 
Maybe that's what so many good trainers are getting at when they refer to focusing on movements and not muscles.  While most of us think about how great the pull-up is for the lats and the biceps, the fact is that's involving a whole lot more than just two types of human meat to successfully pull off the movement.  Were we to try to construct a routine based on strengthening every muscle doing some work to get over the bar we'd be left with an unwieldy-long workout that wouldn't produce the same results if we had just stuck to doing pull-up progressions. 
 
I could keep going on and on about how bad this article sucks, provoking ourselves to the point of projectile vomiting and firebombing but let's leave it at this:  it is entirely possible for all us, men and women alike, to do pull-ups with some proficiency.  We just have to stop treating this movement like a muscle-specific strengthener and spend some more time getting to know it better.  We're all going to vary on how fast we accomplish that goal but it's still doable.    


On the other hand, 6'3", 275 lbs with long arms=disadvantage??

Tuesday, October 23, 2012

Some Shit Deserves to be Extinct, Martin

Be The First To Comment
Despite the piles of crap that have a tendency to accumulate there, I still like reading articles on T-Nation.  The only ones that I truly value to any degree are usually written by Dave Tate, Jim Wendler, and Dan John.  In other words, if they have to post an abbreviation-ridden description of who they are, chances are pretty good that I don't find a whole lot noteworthy in what they're saying.

That rule still held solid when some guy named Martin Rooney posted an article that popped up on my Facebook wall telling me how to train like a man... for the 7th time.  Apparently, training like a man involved using a shitload of furniture and machinery that was only good for one or two lifts and, of course, these are going extinct because of ellipticals, kettlebells, ropes, and spinning classes.

Okay, I like the Roman Chair.  That one should stay put in every gym, as far as I (a blogger who pollutes the  whole gym scene) am concerned.  The rest of the real estate-wasting stuff, well, why is anyone surprised that some machine that was the latest fitness trend 40 years ago got moved out in favor of yet another trendy pile of shiny new junk?

Call me crazy but anything designed to be used for only one or two exercises isn't going to last very long.  Exercises do come and go.  Too many people are going to follow what the latest strength hero who bursts onto the scene does to get his strength.  When someone engineers a gym toy around today's muscle idol, don't be surprised when it fades away with that lunk.  It's a never ending cycle.

Something that can be used for lots of different exercises justifiably both has a better chance and deserves to survive.  Call my crazy but that's the stuff worth populating a gym space with.  Were I to spend my money, my time and my effort on equipment I'd much rather have ropes, kettlebells and suspension straps in my place of muscle and mind.  It worked so well for building big, strong bodies many years before we were convinced that powerful bodies were built like cheap cars with machinery. 


My Thoughts on Lance Armstrong

Be The First To Comment
It must be both rewarding and annoying at the same time that after so many years, the United States Anti-Doping Agency (USADA) finally skewered Lance Armstrong for doping in his Tour De France.  After rising above all of the dirty athletes to become the most dominant dirty athlete the TDF has ever known, they still couldn't seem to produce the magical positive test to prove that he was a drug users all along.  Still, they can use their odd power to say that he was.  It seems to me like such a hollow victory. 

Yes, I firmly believe that Lance Armstrong used drugs to produce his record seven straight Tour De France victories.  I have less evidence than the USADA has but since I'm just a puke with a computer and a blog address, I'm not burdened with any particular requirements to prove what I think.  I just have the ability to connect the dots.  Ironically, this isn't too far away from what the USADA has. 

We can all agree that the Tour is a bike race, the most prestigious bike race in the world.  There are other titles it has.  One might be the most obvious example of a doped-to-the-gills sports events there is.  Another title could also be a voluntary foray into a chronic wasting disease without dying...unless you used performance enhancing drugs.  The simple truth about the TDF is that the speed of which the competitors race over such a distance and for the period of time they do it in would kill even the best non-chemically enhanced endurance athletes from muscle destruction alone.  These competitors couldn't possibly do it without drugs.  Their bodies would give out like a cancer or HIV patient.  So, a seven-time winner would have to be doing something to rise above and take the title. 

Another oddity about Lance Armstrong is his height and weight.  When we read that he was 5'9 and 160 lbs at his peak, we don't think anything of it because it's so extra-average for an American Man.  By professional cylists' standards, he might as well be Lou Ferrigno.  Most of these guys on bikes are mighty midgets, most being 5'3"-5'5" and barely over 130 lbs.  The extra size should put him at a disadvantage since most smaller people with less muscle mass to deliver oxygen to should render him in the bottom of the pack rather than a record-breaking run as king.  Something odd was going on...

Going back to alternative titles to give to the Tour, a third title would be the longest-running, doped-up sporting event ever.  Indeed, people have been cheating by taking things to win this race almost as long as the race has existed.  To my knowledge, the earliest use of arsenic as a performance enhancer in sports was used in the Tour back in the early 1900's.  Apparently, before it kills you, it gives your much-beloved, muscle-moving ATP quite a kick into overdrive.

So, taken into account that Lance Armstrong produced unheard of dominance in a race ridden with PED's for nearly as long as the race has existed, it's hard not to reason that he wasn't dirty as the rest of them were.  Perhaps the flagrancy of his dominance and the fact that he couldn't be caught after all of the blood n' piss samples were in after the race was just too much for the powers-that-be to tolerate.   Something had to be done. 

What we can take away from this is that in the world of professional sports, there are few clean miracles left out there.  We shouldn't burden ourselves with dreams of being just like these people unless we're ready to scour the Earth for the best in muscle-enhancing drugs to do get there.  This is just another reminder that these people take bodies that most of us don't done have and fill them with substances we probably (and hopefully) don't want to take.  That's not a path worth going down. 

Sunday, October 14, 2012

Homemade Weights Cable Exercise Machine

Be The First To Comment
This is a great little build for those wanting to make your own pulley exercise machine.

Featured on Instructables.com this is an easy to build cable weights machine.

Check out the link for full details including a downloadable PDF with all the plans including dimensions

If you like the look of this you may also like to take a look at a previous homemade weights pulley machine featured here on DIYStrengthGear


Cable Exercise Machine

Tuesday, October 9, 2012

How to Make Your Own Atlas Stone Mould

Be The First To Comment
Atlas stones are superb for strength and conditioning training and feature in almost all strongman events. They are in fact a true strength of manliness and have been used for centuries to test this.

I have found this superb resource for making your own atlas stone mould


Check out the full article on Ontario Strongman where Grant Buhr runs through everything from stone sizes and weight, form construction to mould set up and fibreglassing


Although this process is certainly not a simple one, it would be very rewarding to make an atlas stone mould and atlas stone from scratch using this information

If you like stones and stone lifting you may be interested in making the next best thing to an atlas stone - the stone roller, this requires less gear and is great for training and strength testing

You may also like these atlas stone videos

Saturday, October 6, 2012

My Pull Up Bar

Be The First To Comment
There are dozens of different ways to mount of pull up bar. It's a project that's really unique to your situation so there's no way to give a design that everyone can use. That's why I haven't done a project for it yet even though it's a very important piece of lifting equipment. But I finally decided to just shoot a quick video showing you what I did to install a pull up bar in my home gym.


Cost: $15
Project time: a few minutes
Difficulty: You can get the store to cut the pipe if you need to, so all you really have to do is drill out a hole in the wood and screw them into the wall. Very easy.

Tools Needed:
  • Drill
  • Hack saw (optional)
  • Wood boring bit (the size of your pipe, probably 1 inch)
Materials Needed:
  • Two 2x4 studs
  • Long deck screws (probably 3 inch long)
  • length of 1 inch (outer diameter) pipe (how long depends on where you're mounting it).


One thing I forgot to mention in the video is to make sure there is enough room between the wall (above the door) and the bar. If you mount it right in the corner like I did, and the bar is above the door there is not a lot of room. This isn't a big deal for PULL UPS, but if you intend to do CHIN UPS it can create a problem. My hands are small enough to do chin ups too but I can't put my homemade Fat Grips on there and do chin ups with those.

If this is a concern you should consider mounting it back away from the door a bit so you have plenty of room. I can't do that in this case because it's under the stairs so the cealing is angled and the farther away from the door the lower it gets. I have no desire to do fat bar chin ups so it's not an issue for me, but it's something to condise.

Remember this is just an idea. This is showing you what I did. Mounting a Pull Up bar is not a one size fits all project. Take these ideas and custom fit them into your space if you are interested.

- Carl

Friday, October 5, 2012

DIY Neck Harness

Be The First To Comment
The most well known commercial neck harness costs around $40. For what amounts to a few straps and carabiners that's quite a lot. I decided to try to make my own. I did it for less than $10. I use it mostly for strengthening the muscles to reinforce proper posture. There is another DIY design out there but I decided to try to make mine look a little more professional.


Cost: $10
Project time: depends on if you use a machine or sew by hand
Difficulty: You have sew. If you don't know how it's easy to learn.

Tools Needed:
  • Sewing Needle or Sewing Machine
Materials Needed:
  • Lashing Straps or Towing Straps
  • Strong Thread like Upholstry thread
  • Duct Tape (optional)
  • 2 Carabiners
  • Velcro hook and loop


- Carl

Friday, August 24, 2012

How to Make Your Very Own DIY Pull Up Bar

Be The First To Comment
Check out this great video on how to make your own DIY pull up bar.
You can't shy away from the fact that the pull up or chin is a very functional way to build strength and fitness.
Do it for a small amount of cash
Enjoy!


Sunday, August 19, 2012

Unilateralism

Be The First To Comment
One of the greatest sins in my book is the disregard, and even contempt, that I see out there for any sort of exercises that are single-limbed in approach.  I know where it comes from too:  you just can't move the same amount of weight with one one limb that you can move with two.  In the world of weights where the most iron moved is the sole measure of value, a unilateral move is just shit. 

I take a different viewpoint.  As I've said before, weight is simply a means to increasing the difficulty of the movement.  If the movement needs a lot of weight to make it hard then isn't the movement itself a little too easy?  A movement that requires less weight to be considered very difficult is actually a more efficient use of the weight available to you. Those of you blessed with piles of iron obviously don't see the value in this.  In a way, you're kind of the strength training version of pampered house pets.  Welcome to the jungle!  Out here, we learn how to make the most of the least.  Unilateral work is the way we can do that. 

Ben Bruno wrote a pretty good article over at T-Nation where he described his year-long experiment with training his lower body, one leg at a time.  Apparently, he did this in response to a back injury.  The single-legged approach was more kind to his back.  I've heard this approach parroted by a couple of sports-based strength trainers.  I can't comment on it since I don't have an injured back and I haven't done a lot of the work he described but he obviously learned how to get some serious leg training within his limitations.  Iron junkies might balk at the notion but it still worked very well. 

This guy seemingly never takes the weighted vest off... allegedly not even for sex. 

My experience with unilateral leg training for the past few months has been pretty simple:  Pistols.  Honestly, I suck at them.  Granted I suck a lot less now than I sucked in January when I admitted to myself that the fact that I look like a fool while attempting these was simply unacceptable to a guy who runs a "bodyweight blog."  Still, I admitted it and I think that's a lot of people's problem with these:  they don't want to admit that they don't do these because they can't do these.  Pistols have a way of telling the mind a story of a trainee who spends too much time sitting down, getting tight and stiff and then spends their precious gym time lying to themselves that there's something wrong with muscles in and around the hips that don't impress girls too much.  So, they ignore them, throwing them into the trash heap of, "they're just a trick".  I decided to take a giant shit on this scenario and get my ass to the grass on one leg. 

When we move to single-limb, upstairs version, we come to one of my favorite ways to train the upper body, as well as another reason why unilateral work is so awesome:  it's a great, great way to strength train under time constraints.  Just simply blast one limb, doing a movement until you're exhausted.  All you've got to do is break long enough to catch your breath (a little) and then do the other side.  It's possible to get a lot of work in a very short period of time training like this. 

Oh, and training on one arm can be brutally difficult!

We began with the wonders of unilateral training's ability to make great training with a limited amount of weight to move.  A deeper exploration reveals that there is a lot of other benefits to this approach to progressive strength training.  They than work around injury to get stronger and expose weaknesses in need of strengthening just as well as they can serve as a means to make what's strong even stronger.  That kind of approach deserves more recognition than it's currently getting.  Don't make the same error of not realizing a good thing when you see it. 

Thursday, July 26, 2012

"Modern" Gyms Stink...like third world countries

Be The First To Comment
I've got an interesting question for my readers:  how many times to you hear about something pathetically wrong often but never actually see it for yourself?  Then, when you see it, you're still shocked in spite of knowing it was like that all along?  I'm talking about that feeling you get when you hear that third world countries can be real shitholes that make you appreciate what you have but it never really sinks in until you're actually there to see and smell how bad it really sucks.   Wow, it really was true all along!  Learning about it doesn't replace the shock of actually seeing it, does it? 

On a much less serious level, I've had that kind of shock that I still can't get over when I step into the local fitness club to take my son for infant swimming lessons.  I've been to this place before and I know that they're all a sad excuse for a place to get fit.  Up until this point, it's been a long, long time.    I've spent far more of my time tearing through all kinds of weird BW variations, sandbag work, and truck pushing in countless sewer plants, parking lots, hotel rooms, truck stops, farmers fields and my own basement.  So, when I arrive to get my son accustomed to swimming, I pretty much feel like I've landed on Mars.


As I watch the people waddle around in clothing of various levels of... FUCKING-GROSS-TIGHT... It strikes me like a Halloween party.  It's a place where everyone shows up, dresses up like athletes, and play-pretends that they're getting in shape. 
Let's pretend we're punching!  What bullshit!  Punches need to be thrown with extreme violence, even if it's just at the air!


 This isn't a criticism of playing or using a little bit of imagination when training.  I think that the way lots of people train is boring as hell and could use a little creative thought.  Put that into how you get into shape, not into pretending that you're getting there. 

As I continue to try to breathe some artificial respiration into the oxygen-starved brain of the modern fitness industrial complex, I can't understand how so many shaved apes never notice how bad their overall posture sucks.  Considering that most of these places have enough mirrors to start a fun house, and that most of the people going to the gyms spend way too much time walking around naked, I'm struck that they never notice that their bodies are starting to look like the a weeping pine tree.

The people in the cycling classes seem to be the worst culprits, for obvious reasons.  The people who use the weight room aren't far behind. These people are easy to spot:  rounded shoulders, perfect pecs and abs, and skinny legs.  I might be dipping my toes in the dirty pond of broscience but I'm of the opinion that the mark of a good workout should result in you naturally standing and walking with good posture.  Too many people wreck their bodies by sitting slouched over.  That shouldn't be replicated in any place devoted to health. 


Why is it  ALWAYS the people you NEVER want to see naked in the gym the ones you end up seeing?

As my cranial pressure-release valve slowly begins to sputter rather than roar, I now realize that I'm probably telling everyone about things that they already know... and despise.  I appreciate you bearing with me.  If you're not one of those people then I urge you to take a really objective look around your McFitness make-believe health club.  These places have everything backwards.  Instead of doing body/soul-challenging,  interesting and inventive work that gets results, most everyone there is engaged in a bad fantasy world of doing unimaginative, brain-dead motion that doesn't do jack-shit towards moving anyone closer to great health, strength, or even a half-decent looking body.  You've smelled the stink of this pile of trash. 

It's time to move on. 

Monday, July 23, 2012

Supersetting Pyramids

Be The First To Comment
Between bouncing around various welfare-ravaged shithole towns in New Hampshire, raising a child, keeping a wife happy, and desperately trying to make more money than I shell out in both work and life I've realized something: 

I haven't posted here in over two months. 

Thank you for hanging around.  As I've darted around the Northeast United States, I've managed to keep some semblance of training going.  Necessity of trying to put together something that satisfies my urge for intense muscle-grinding burn in a unique manner is still alive and well.  Recently, it manifested itself in a quick routine that worked so well that I thought I'd share it with the masses.

I love supersetting with the upper body.  I've made that clear in the past.  I've a few other ways to organize a workout in the past, including pyramids.  I didn't like those so much.  I know it's not right but I feel like excessive rest when training is procrastinating.  Then, it hit me:  why not combine supersetting with pyramids? 

So, here's my idea:  I picked an upper body push and an upper body pull exercise and do a superset, adding a rep to each new set until I got to the point where I couldn't add another rep of either the push or the pull.  Then, I just worked my way back down.  Since I didn't have much time to work out, I selected Diamond Handstand Push-ups and Thick-bar, Close-Grip Chin-ups, knowing that the rep count on these two wouldn't go very high. 

I managed to get to 8 reps before my triceps just couldn't grind anymore. 

So, that worked out to 64 reps of each movement, 128 reps in roughly 15 minutes.  That certainly qualifies as good work in a limited amount of time in my book! 

Wednesday, July 4, 2012

How to Convert 1 Inch Weights for use on 2 Inch Olympic Bar

Be The First To Comment
I quite often find myself requiring just a few small plates to add to my olympic bar to up the weight, but with a lack of 2" diameter plates available and a pile of 1" diameter plates just sat there.

Problem solved!

This is a great idea for converting 1 inch diameter plates to be usable on a 2 Inch diameter olympic bar


I found this great idea on Instructables.com

Another great idea for adding weight to bars and other metallic lifting items is this DIY platemate idea

Monday, June 25, 2012

Deadlift Platform

Be The First To Comment
Lifting platforms are cool. But they take up a lot of space, they can't really be moved or stored, they weigh hundreds of lbs., can potentially cost over a hundred dollars, and they require a truck or trailer to get the rather large materials home. I came up with a smaller, lighter, cheaper, and portable solution. Though it is designed specifically with deadlifts in mind, that is all I need it for. And it only cost me $15.


Cost: $15 - $20
Project Time: 1 hour
Difficulty: You have to cut plywood and use glue and screws.

Tools Needed:
  • Saw - Either a hand saw or a circular saw or other type of saw to cut plywood.
  • Caulk Gun - if you choose to use Liquid Nails to glue the rubber down
Materials Needed:
  • Plywood - I went with a single piece of 3/4" thick oriented strand board. It was 2' x 4'
  • Liquid Nails - (optional) If you want to glue the rubber down.
  • Wood Glue - (optional) not strictly necessary if you use screws but I like to use it. If you're using Liquid Nails for the rubber you can just use that to glue your plywood together.
  • Screws - make sure they are long enough to go through all layer of the plywood but no so long that they poke out of the bottom layer.  In my case, I used 1 inch long screws to secure two layers of 3/4 inch plywood.

I have been wanting a lifting platform for a while, but I just don't have the space for it.  I don't even really have the space for a half platform to use for deadlifts. But it's getting to the point where my deadlift is heavy enough to want some floor protection underneath.


A full size platform (8' x 8') weighs somewhere around 300 lbs. Hardly easy to move and obviously takes up a lot of space. I don't even really have room for a half size platform (8' x 4').  Since I want it for deadlifts only, and I don't pull sumo I really didn't need anything as big as a half platform. Instead I made a 3 piece design. It's light, you can move it when not in use, and it cost me only $15.

The whole thing weighs 28 lbs. and as you see in the video you can carry it all in one arm and easily store it away when not in use.

- Carl

Tuesday, June 19, 2012

Lifting Belt Storage Rack

Be The First To Comment
Another project that I made from scrap materials. It's a glorified shelf / coat rack but I made it to store my weight lifting belts and other small gear. I previously had these lying on the floor so this storage solution is an improvement.

Even if you were to buy materials for this project you would only need a 1 x 6 board about 60 inches long, depending on how big you want to make it. A few small nails and screws, a square dowel, and some bolts with nuts and washers. It should be under $10.

This is part of the "show off" series, as I didn't record the actual construction process. I made this up on the fly and the exact materials I used is not the perfect way to go about it because I was just cleaning up scrap I had. The project is pretty simple and I explain the construction in the video, but if you would like me to do a full write-up with diagrams and such please leave a comment. If the demand is there I'll do it. But it's basically just a simple shelf with bolts through it for "hooks" and a lip around the edge so my lacrosse ball doesn't roll off.


The reason I suggest screwing this thing into studs is because it's going to have a decent amount of weight on it, especially if you hang chain belts from it. To find the studs in your wall either use a stud finder tool or you can knock on the wall. You'll be able to hear and feel when you're over a stud because it will sound hard, for lack of a better way to describe it. Where there's no stud it will be distinctly hollow.

- Carl

Saturday, June 9, 2012

DIY Sandbags

Be The First To Comment
I have wanted to do some sandbag training for a while now. My goal was to use things around the house in order to make these completely free. Lest I get some complaints, I know it's not best sandbag option out there. I'm not saying it's good for any purpose you might want to use a sandbag. I'm just showing you what I did to make some basic heavy bags for free. These weigh 50 lbs. each. I've had them for a month now and they have been working well for my purposes so far.


Monday, June 4, 2012

DIY Stone Roller for Stone Lifting Training

Be The First To Comment
In a month I'll be competing in 'The Gathering' -  a 2 day grip competition where folks with strong hands from many areas of the World will congregate and test their strength.

One of the events is the 'Bear Hug Deadlift' where the athlete hugs a stone roller and lifts the bar to knee height for a successful lift. The event is a superb lift for practicing the atlas stones and a great strengthener for the forearms and back muscles.

To train for The Gathering I have made my own Stone Roller

Materials required:

Old dustbin (must have little or no taper in the main barrel)
1" or 2" bar
Sand, gravel, cement
Buckets for mixing
PVA glue


 How to make your own Stone Roller
 
1. Cut a hole the same size as your bar in the center of the dustbin


2. Level an area of ground and place the bin on the levelled area. Set a spirit level across the bin to ensure when set the bar is as concentric as possible.


3. Insert the bar through the bin and into the ground to the correct depth so that once complete the bar protrudes from the barrel equally on both sides (some simple maths here)


4. Use some kind of mould release to assist removal of the concrete from the bin once dried. I used some vegetable oil spray for this. Spray all around the area that will be in contact with the concrete.

5. Mix the concrete using a ratio of 5/6 to 1 (sand to cement) using sharp sand and gravel, make sure the mix is quite wet so that it fills the mould entirely.


6. Use a stick to work the concrete and remove any air pockets.

7. leave for 1-2 weeks (the longer the better), to allow the concrete to set and fully harden

8. Remove from the mould (if your bar is quite long like mine, it may be a 2 man job to turn the mould upside down unless you're feeling strong!)


9.  Hey presto!! A 114.5kg Stone Roller almost ready for putting to action for stone lifting training.


10. Next step is to paint the stone with PVA glue, this will prevent the surface of the stone from rubbing away and dusting. Allow to dry for at least a day or until the surface is not tacky.


11. Lift and enjoy!

In 'The Gathering' no tacky shall be allowed, only chalk which in turn makes the lift more challenging.

This stone ended up 15" long by 16" diameter at a weight of 114.5kg 252 lbs and loadable to well over 300kg


Thursday, May 31, 2012

Dip Belt Weight Rack

Be The First To Comment
Loading up weights on to a dip belt can be a bit of a hassle if you're using more than one plate. I realized this when I did a chin up session consisting of ramping singles and had to do a lot of weight changing between sets. My solution was to build a rack to hold the weights for me. This makes getting the belt on and off easier and makes loading the weights on to the belt a lot easier.

Cost: less than $5
Project time: 30 minutes
Difficulty: You have to cut off a piece of 2x4 wood and drill holes in it.

Tools Needed:
  • Drill
  • Saw to cut wood (I used a normal hand saw)
  • Screwdriver (you can use your drill)
Materials Needed:
  • One 2x4 stud (8 ft. long)
  • Some 2 1/2 inch deck screws (I like the T-25 star head)
  • Wood Glue (optional)

This is yet another project I built from scrap wood. You need only a single 2x4 stud (8ft. long). and some wood screws. If you don't have a dip belt, check out the Project Index for that project.


- Carl

Friday, May 18, 2012

You Keep Asking. Here it is: How I put together my routine

Be The First To Comment
That kind of puzzles me too.  I'm not sure why people are so interested in how I put together my routines.  I do have a few protocols for putting them together but it's not like I've built revolutionary quantities of muscle mass lately or done amazing things to be picked apart on a Youtube video by the ass-monkey experts using my current programming guidelines.  If you want to know what I do, then get ready to be blown away.  Right.  Now...

UPPER/LOWER BODY SPLIT ROUTINE

Profound and innovative? Pretty much like everything else that gets written out there about strength training.  I do have some things that I keep in mind when I decide how I'm going to put together my routines.  There's probably considerations that we never see in any of the strength sports programming out there that I take very seriously.  I'm sure they're things that you have to cope with too.  Items like time constraints, being able to go work the next day and perform normally.  Having limited, or even no access to a gym or specific equipment.  It's easy to program strength training when you have minimal commitments to anything else but yourself.  With that kind of life, you can afford to mold your life to your training.  For the rest of us, life happens and it's not quite so easy and the training molds more to the rest of our life. With an infant son, my training is, more than ever, all about getting a good workout under a time constraint.  30-40 minutes to myself, when I'm at home, is a luxurious amount of workout time.  I can get more than that...if I'm traveling.  So, then I work with limited equipment issues.   No matter what I do, I do have a labor-intensive job so whatever I do working out can't drain me to the point were I move slow and painfully the next day. 

Monday, Wednesday and Friday are my upper body days.  Tuesday, Thursday, and Saturday are for the lower regions.  Sunday is my goof-off day and I do whatever I feel like doing.  I try to work out everyday.  It doesn't always happen, but I get a B+ for effort.  As long as I moderate, picking easy and hard days, training every day hasn't been a problem for me.  Things get grey when I try to work out twice a day, every day.  That taxes the amount of recovery I'm capable of with 4-6 hours of sleep. 

When I do my upper body work on Mondays and Fridays, I superset push and pull movements, doing two or three supersets, each one with more volume than the next.  I've found out that my upper body can do a lot in a short period of time without worrying about over-doing it.  That's one thing that I love about supersetting:  less downtime.  You "rest" by switching to another set of muscles to workout.  It really cuts down on the amount of time spent training. On Wednesday, I do only pushing movements.  These I'll do with more of a conventional sets and reps.  No supersetting here since this day usually amounts to a shoulder day.  There aren't too many push movements that don't hit the shoulders.  So, I allow for some extra rest on these. 

Lower body days aren't done with the same kind of mad dash mentality that my upper body days have.  I've done this in the past and spent a day or two limping around with sore muscles as a result.  This isn't fun if you walk several miles or climb ladders all day (both of which I do a lot).  I recall reading somewhere that Tom Platz used to count out the number of steps he'd have to take daily so he could minimize this walking after abusing his legs with his infamous leg training.  Do you have that kind of capability?  Neither do I.  As it so happens, two of my (ongoing) goals are to get better at pistols and be able to do glute ham raises.  This has been much of my leg training, starting with the pistols in low reps and then moving to some GHR work (lately, 5 partials plus 5 eccentric GHR's to a set, one right after another).   I find that when I'm trying to master new movements, it's better to minimize the whole, "most volume in the least time", approch to training.  So lately, these days aren't as rugged on my body.  This is where I kind of wander off the conventional upper/lower split plantation because I also do some Two-Hands Anyhow work after I finish up with the pistols and the GHR. 

Although I'm trying to master these two lower body moves, I've been known to throw in a heavy squat day once a week for a break.  I like doing belt squats, zerchers, and some squat-press with two kettlebells.   Regardless, I don't forget that my legs have muscles in the front, back and sides. 

Sundays are my blank slate.  You might catch me doing all core work, complexes, deadlifting,  or whatever sounds interesting to me at that particular time. 

This summary and outline is meant to be nothing more than my story about how I do what I do to stay strong with some very real world constraints.  I'm still a huge advocate of getting smart enough at training to put together a routine for yourself.   Nobody else's routine is going to take into consideration all of the little idiosyncrasies of my life.  Maybe that's why I find the inquiries about how I do what I do odd.  Still, there's always something to be learned from other people's methods and hopefully you can find a few of my pointers about routine construction useful. 

A slice of my week working out...

Monday
Switch Grip Pull-ups, 8 reps
Diamond Handstand Push-up, 8 reps... repeat 4 times

Decline-fingertip push-ups, 25 reps
Sandbag (87 lbs) rows, 25 rep... repeat 4 times

Tuesday
Pistols, 6 sets 5 reps per leg
Hold bottom position of pistols for 15 seconds, twice each leg
GHR work (described above) 4 sets
Two Hands Anyhow, 3 each side

Wednesday
One-arm push-ups, feet < shoulder-width apart, 3 sets 5 reps each arm
Push-ups with sandbag on my back, 4 sets 10 reps
Handstand push-ups 3 sets 15 reps

Thursday .... somehow I got stuck watching the kid while my wife went shopping with her mother and friends.  Forced day off!

Friday
Ladder Pull-ups, 8 each side
One arm push-ups on suspension rig 8 each side ...repeat 5 times

Sandbag clean and press 10 reps
sandbag rows, 20 reps... repeat 3 times

Saturday... same as Tuesday

Sunday
300 lbs deadlifts, 6 sets 6 reps
150 lbs belt squats 8 sets 8 reps
pull-ups, wide grip 10 sets 10 reps

Tuesday, May 15, 2012

Homemade PVC Parallettes

Be The First To Comment
DIY Parallettes

Great idea for making your own parallettes


Check out this video for some ideas for what to do with them

Friday, May 4, 2012

So, what is practical?

Be The First To Comment
A while back, I mentioned that I'd love to get rid of the hideously over-abused adjective, "functional," in relation to any kind of physical training.  I still think that a far better term for the idea that everyone keeps getting at but uses this increasingly stupid term incorrectly is practical.  As far as I'm concerned, that implies that there's some good sense in doing whatever it is  you're doing. 

That last post zeroed in on that dumb-ass Nautilus Lat machine that worked that piece of meat-real estate without using the hands (oh, GREAT IDEA THERE).  Let's back that out a bit and ask ourselves what's practical to do in the gym that has some carry-over to real life?  That's a huge, loaded question that I'll break down into more posts in the future.  For now, I'm going to zero in on something that's crossing my grey matter at the moment:  rep range. 

What goes on in a gym and what goes on outside of it sometimes conflicts with each other more than it should.  Then again, with many people making a living sitting down most of the time, the practicality gap is understandable.  A lot of people don't make a living with physical labor. 

A little while back, we hired a guy who did a few years in jail and, in my experience, demonstrated the typical jail-house look:  massive upper body with modest (at best) lower body development.  When there was something that needed serious, upper body horsepower/max strength, this guy was impressive, so long as you didn't need to do anything with him afterwards.  He was as worthless as having a pair of tits in a gay bar afterwards.  In other words, he had nothing resembling strength endurance. 

Max Strength rules many places of strength as the undisputed best goal to maximize.  That's a little odd considering so much of what we do outside of the gym has little to do with max strength anyway.  I don't see manual labor as a total strength endurance proposition but the best workers are able to keep up something physically difficult for longer than most. 

While the gym might suffer from lack of carry-over into real life, real life has some carry-over into the gym.  Most of your max effort movement-arrangements are things that you might be able to do now but not later.  Today, maybe, but not tomorrow.  You really don't have total ownership of it if you can't readily duplicate it do you?  Isn't there something satisfying about conquering something to the point of being able to do it repetitively?  What's truly impressive is when you can do something really fucking hard over and over again!  As far as I'm concerned, that kind of mastery of an exercise is what's impressive...

...and practical. 

Tuesday, May 1, 2012

DIY Kettlebell

Be The First To Comment
Here we go again!

Another take on the good ol' homemade kettlebell, quite a good one though!

Monday, April 30, 2012

The Pinch Gripper

Be The First To Comment
Video of me putting together a pinch grip tool made from scrap parts I had in the garage. I designed it to utilize what I had but it should give you an idea so you can change things if you want to buy better parts. It is made to work with a loading pin. In particular, the DIY loading pin on this website. If you had to buy the parts it would probably cost $5 to $10 depending on what you need. It cost me nothing.


Cost: less than $10
Project time: less than 30 minutes
Difficulty: You have to cut off a piece of 2x4 wood and drill holes in it.

Tools Needed:
  • Drill
  • Saw to cut wood (I used a normal hand saw)
  • Vice Grips, or Wrench (to turn screws more easily)
Materials Needed:
  • Small length of 2x4
  • 2 Eye Bolts or Eye Screws
  • 2 Washers and Nuts (if using bolts)
  • 2 Carabiners

This is something I put together quickly out of scrap parts. If you are using this with a normal loading pin you might have to adapt it slightly to work with the single hook on your pin. Off the top of my head, a length of chain between your eye bolts could work. Or simply use one bolt in the center of the wood. If you use a bolt I would boar out a hole in the top of the wood so you can sink your nut into the 2x4 so it doesn't interfere with your grip. Your bolt would have to be the perfect length in such a case. If you are using my chain loading pin design as seen on this blog then you won't have any of these issues.


- Carl

Loading Pin

Be The First To Comment
This is my idea for the simplest cheapest loading pin that I could come up with. A commercial loading pin is around $50. There are DIY options out there using pipe that would probably run around $25. My design is a bit unorthodox but it's less than $10 and it functions well enough for what's I have used it for. I mean, for that which I have used it. It requires basically no work and thus no time to make, besides the time spent buying the materials from the store.


Cost: less than $10
Project time: A few seconds
Difficulty: There is basically no work to be done at all.

Tools Needed:
  • Functional Human Body
Materials Needed:
  • 3 feet (about 1 meter) of Chain
  • 1 Carabiner

I know this is a bit unorthodox and perhaps for some applications this won't be a good option but for many it will work just as well as a normal loading pin.


Just one additional note that I didn't mention in the video. Instead of using extra plates to sit the rig on, you could use a couple small lengths of wood, like 2x4s. But really that's not even needed unless you're loading quite a bit of weight, like over 90 lbs.

- Carl

Tuesday, April 17, 2012

How to Make a Homemade Punchbag

Be The First To Comment
DIY Punchbag

Although I am sure there are some easier ways to make a homemade punchbag, I really like this one

Materials required:
Old Carpet
Plastic tube
Plywood
Screws
Duct tape

Drill
jigsaw

Sugar Needs to be Regulated Like a Drug?

Be The First To Comment
Does anyone remember that scene in the Exorcist where Father Merrin tells Father that the demon in Reagan was a liar but would also blend lies with the truth. That's a rare detail from a movie that's also too true in real life. The best lies have a few elements of truth to them. The lie serves to make the truth appear to be something that it's not, like When Reagan started talking like Father Karras' dead mother in order to make him break.
Such as it is with the latest pack of manipulative, power-hungry and wanna-be policy making doctors out of San Francisco who starting the latest charge against sugar in the American Diet. The 60 Minutes Clip all about this is showing up frequently on fellow blogger's web sites. In case you missed it, here it is:


I wouldn't even begin to disagree that the amount of sugar in most people's diet is as appalling as it is dangerous. Where I start to get pissed off and call bullshit is the notion that sugar affects the brain much like cocaine does. Since it acts on the brain the same as cocaine, it should therefore be regulated like a drug. This is the lie blended with the truth.

The whole purpose of the sensation of pleasure in the brain is a measuring stick so that the brain can determine the necessity of whatever it's ingesting, sensing or experiencing. Dopamine release is measured by the brain and then based on the level of release, the brain figures out how much it needs what just triggered the release. Since every cell in the body needs sugar to function, it triggers quite a dopamine release in the brain. Makes sense, right?

We don't need cocaine, or any other drug for that matter, to survive. The problem is that all recreational drugs are fooling our brains by triggering huge releases of dopamine. Cocaine actually goes one farther. The brain normally re-absorbs dopamine. Cocaine delays that up-take, therefore increasing the sense of need in the brain. So, it's incorrect to say that sugar behaves like cocaine. It's more accurate to say that cocaine is imitating sugar (and definetly doing it TOO well!).

So, now that you realize that they're heavily distorting the truth, the question is why? Why would they distort a comparison between sugar (which we need, just not in the quantities and level of refinement that' we're getting) and quite possibly natures most perfect recreational drug? The simple answer would be that they want control. You make up and debate amongst yourselves what they want to do with that kind of regulatory power but the fact remains that they're using blow because it's as illegal as a drug gets. The government has gone to insane lengths to control it with marginal opposition from most decent people. Likening sugar to cocaine sounds like a good way to make people not question the regulation.

That, to me, is a powerful statement about what's going on here. What's also laughable about it is that this is the same medical establishment that has been horribly inadequate in determining what people shouldn't be eating to begin with. They do expensive and extensive studies on the effects of refined sugar to find out something that their ancient Nemesis Bernarr MacFadden told people back in the 1910's. He certainly didn't need to put a human in an MRI and feed them soda to prove that high fructose corn syrup royally sucks! They just weren't paying attention because they fucking hated MacFadden's guts!I think that MaFadden is in his 50's in this picture.
The simple fact is that they've based the medical practice in the USA almost solely on being reactive than proactive. It's not hard to find a doctor who can't even tell you what cholestrol does for the body but can prescribe a host of drugs to bring it down.

Ultimately, I think that half-truths make for half-ass results. Going around distorting the truth about sugar won't amount to people reducing their intakes. Most of us know that cocaine and sugar aren't related to one another because they release lots of dopamine any more than a Prius and a Hummer can both be called similar cars because they burn gasoline. This kind of half-baked thinking just cheapens the argument. Yes, the 1/3 lbs-sugar-per-day habit has got to stop but inviting in the same crooks who helped create the problem in the first place and expecting them to solve it isn't a sound strategy.

Wednesday, April 11, 2012

Concrete Weights

Be The First To Comment
I have been watching Craigslist for months, if not years, just waiting for a great deal on used iron weights. And I'm still waiting. Obviously you have to get legit weights at some point, but until I find that cheap stash of 45s at a garage sale or something I make due with with what I have. Casting my own weights out of concrete has made it possible to keep progressing while I continue the search for used weights.


Cost: $6 for the mold and then 5 cents a lb.
Project time: maybe an hour per plate plus dry time
Difficulty: It's just mixing cement for the most part so not very hard at all

Tools Needed:
  • Small shovel or trowel to mix and spread cement
  • Hammer
  • Scissors (to cut tape)
  • Saw or serrated knife (to cut plastic mold)
  • Wood saw and drill (optional, if you make the wood frame)
  • Empty Spray Bottle (optional but useful to spray water)
  • Caulk Gun (if you decide to use caulk and you buy caulk that needs the gun)
Materials Needed:
  • 80 lb. bag of Quikrete cement mix (I used the "just add water" yellow and black bag mix)
  • Duct Tape (optional but a cool addition so I recommend it)
  • 2 inch diameter PVC pipe
  • Round storage bin or oil pan or other round plastic container with a 15" diameter
  • Caulk (optional, you could use tape, I think)
  • Few handfuls of dirt


I cut this video down to the essentials so I won't explain the whole project step by step here, just watch the video. However, I will make a few notes below; things I didn't have time to elaborate on in the video.

A TEMPORARY SOLUTION

To me this isn't a permanent thing. Concrete is simply not as strong as we want compared to metal plates which are basically indestructible under normal use. Though concrete has high compression strength, the way forces would be applied to a plate on a bar being aggressively set down on a heavy deadlift would no doubt break the cement over time. Concrete also is not as dense. This means it will take up more space on the bar and result in less weight you can fit on your bar. It's basically like half as heavy as iron plates. So a 45 lb. concrete plate would be the same size (at least) as two 45 iron plates. That means if you could cram 800 lbs. of iron plates onto your bar, you could only cram 400 lbs. of concrete plates.

Also, I do not suggest you use only concrete plates. If you don't have any weights I do not recommend this as your solution, unless you don't plan to pull off the floor, meaning deadlifts or power cleans or rows, etc. I don't trust cement to be strong enough to handle the stress of setting down a heavy deadlift.

I suggest you have at least a pair of 45 lb iron plates, as well as the smaller increments, 25, 10, 5, and 2.5 lbs. You can make smaller increments out of wood or industrial washers. I made a post about that, look at the Project Index for it. I personally bought one of those 300 lbs. weight sets from the sporting goods store. I think that's a decent starter set. When it costs like $200 you do get a bar that will last at least a year, plus the 255 lbs. of iron plates, including all the smaller increments. So these concrete plates make a decent temporary addition to an iron set.

Eventually though you want to find some cheap used iron plates because concrete weights are not a long term solution in my opinion. Even if they hold up, you'll eventually run out of space on the bar. Now I suppose you could probably get something like 500 lbs. on the bar using a combination of iron and concrete weights. So if you never intend to deadlift more than that I guess it might be good enough.

But to me this is a temporary solution until I hit the motherload of rusty 45s from someone on craigslist or a garage sale whom doesn't care about lifting and just wants me to take the stuff away for like 50 bucks.

PRECISE WEIGHT

This I am ashamed of. I didn't put quite enough thought into it before I started the project. I basically decided on a size, a thickness, and then I poured my plates to that thickness. As a result, the two plates I poured probably aren't the same weight. Nor are they a specific precise weight. I was roughly intending them to be 35 lbs. I think they will be a little more than that after they cure. And if they both end up being the same weight it would be pretty lucky. Since I know how to do this right, I'm ashamed that I didn't do it this way. It didn't occur to me until I was already done.

I recommend you weigh out your dry cement mix. So if you want a 35 lb. plate dump 35 lbs. of dry mix into your mixing bucket. As a weightlifter I can only assume you have a somewhat accurate bathroom scale. At the very least it will be consistent so both plates will be the same. By doing this you will ensure that all the plates you cast are as close to the same weight as you can get them. This is what I should have done but I just didn't think of it in time.

As a result, though my plates will be roughly the same size, they are probably not going to be exactly the same weight. It won't be a big deal since I can just add micro plates to compensate when they are on the bar. My plates are also probably going to be a bit more than the 35 lbs. I was intending. Again not a big deal. But it's just easier if you weigh your mix. That way you'll only have to mix it up once and pour it into the mold. You will not have to mark your mold either. For what it's worth, 35 lbs. will be somewhere around 2.5 inches thick, just an FYI. I like this thickness because cement doesn't have a high tensile strength so having it thick is a good thing. I don't really recommend making light plates out of cement for this reason. They won't be as strong if you make them thin and if you make them thick but light you just waste space on your bar.

PVC PIPE

The way PVC is labeled is by the inner diameter. So when I tell you to use 2 inch diameter PVC pipe that is what it is labeled in the store. The actual outer diameter is more like 2.25 inches. So the hole it leaves in your cement plate will be 2.25 inches, which is more than big enough to fit on the bar. We make a better fit with a duct tape ring. See the video for that. I just wanted to clarify that 2" pipe is what it will be labeled as, and it will have an outer diameter of 2.25 inches.

THE EXTRACTION PROCESS

I made wooden frame to help me take the plate out of the mold by myself easily. I had the scrap wood and tools so I spent no money on it. If you don't have this stuff you don't have to make it. I'm sure there's something around the house you could use to support your plate as you tip the mold upside down. If the inner PVC pipe holds tight to the cement like it did for me in the video you might even be able to just pull the plate out using the PVC as a handle of sorts. The PVC did not hold to the cement like this when I cast me first plate though. Anyway, it's not rocket surgery here.  Point being, you don't have to spend money or time making that "extractor" if you don't want to. I only did it because I had the stuff and I was bored and figured it would make things really easy, which it did.

Also, when I cast my first plate I sprayed the mold first with some oil. The idea being that it would help release the concrete. The second plate I cast I did not do this. It doesn't seem to matter. The concrete will not stick to the plastic mold. However, I did have a hell of a time getting the PVC pipe out of the second casting. This may or may not have anything to do with not oiling it. The pipe also was a little wiggly (i guess the caulk didn't hold as well) the second time, so it may have set slightly off kilter, which is what I'm betting on. Point being, you don't need to oil it or use any kind of mold releasing agent. But if you want to spray it down with some WD-40 it won't hurt anything.

MARK YOUR PLATES

Once you let your plates cure for a few weeks I would suggest painting their weight on them. This is especially true if you messed up like I did and both plates don't weight the same amount. Mark their weight on them so you know exactly what they weigh.


INNER CORE

In the video I show you how to line the inside of the plate with duct tape to protect your bar and give it a better fit. Since then I realized there is another option. The PVC pipe you used to cast the center hole is the perfect size to slide over the bar sleeves on an Olympic bar. So you could cut down a length of that PVC the same thickness as your plate, then hammer it into the center. It will fit very tightly. As you saw in the video I had a hard time getting the pipe out of the plate when unmolding. I had just a hard of time hammering in the new shorter length of pipe. I'm not sure how this will affect the plate in terms of the concrete expanding. But it fits beautifully on and off the bar with ease.I would say the PVC core is nicer, assuming it doesn't have some unforseen negative impact on the expansion of the concrete.

That being said, using concrete plates is a temporary solution so you want the price to be as low as possible. I had the scrap PVC so decided to try it out.


- Carl
 

© 2015 Strength Training Program - Designed by Mukund | ToS | Privacy Policy | Sitemap

Hide
X